Thursday, September 27, 2012

Pesto Chicken Penne


Check out that delicious, crispy spinach! Throw in some cheese, tomatoes and a creamy alfredo-pesto sauce, and I'm SURE you'll find some excuse to make this sometime soon. :)

You know what I said about overlapping ingredients? Well, I really like to do that. So every time I decide to do a cook that involves Spinach Pesto Manicotti, it has to include Pesto Chicken Penne as well - they both use about half of a 7.5 oz bottle of pesto, so that keeps things much easier for me. I know that I'll need 1 full bottle of pesto, rather than storing a half-used bottle in my fridge and waiting for another opportunity to use it. 

The original recipe comes from here, but the proportions are ALL KINDS of crazy. So I have made a lot of modifications and have finally tweaked it into a recipe that our family enjoys. It's one of those recipes that sneaks in some vegetables - YES!! :) Yummy spinach...

Pesto Chicken Penne
Ingredients:
1/4 cup bread crumbs
1/4 cup parmesan cheese
1 TBSP Olive Oil
8 oz cooked penne pasta
3 cups cooked chicken (I always use shredded)
2 cups Italian blend cheese
2 cups baby spinach leaves
15 oz can diced tomatoes
4 oz prepared pesto sauce
7.5 oz prepared alfredo sauce
3/4 cup milk

  1.  Combine bread crumbs, parmesan cheese and olive oil in a small bowl, just until moistened. Set aside.
  2. Prepare pasta according to package directions. Drain Well.
  3. Combine chicken, Italian cheese blend, spinach, tomatoes, pesto sauce, alfredo sauce and milk in a bowl. Add pasta, when done, and spoon mixture into baking pan. Top with bread crumb/parmesan cheese mixture.


To prepare immediately: Bake at 350 for 40-45 minutes.

To freeze: use foil pan, and double wrap the top with tinfoil. Place in freezer. When you decide to cook it, allow PLENTY of time to thaw. I recommend putting it in your fridge the night before, then moving it to your kitchen counter a few hours before you plan to bake it, just to be sure it's not a solid brick of food. Baking times will still vary. Bake at 350 for at least 45 minutes, it may take a bit longer, though.

Tuesday, September 25, 2012

Rocky Road Cookies

Ok, ok... I know my blog is supposed to be about once a month cooking, but as much as I love my crockpot and the ease of freezing all of our meals... baking is still my favorite thing to do in the kitcen. :) 

I have the biggest sweet tooth of anyone that I know and I've been able to deal with that by baking fabulous desserts... for myself! hahaha yes, I probably should weigh 300 lbs, but for some magical reason I don't. Yet. Maybe in a few years... 

Anyway, I have recently become a licensed real estate agent. What does that have to do with baking, you ask? Well... I've decided to incorporate my love for sweets with my new career path. What?! So, in my ambitious efforts to find leads and get my first listings I decided to bake cookies for prospective clients. My DH and I searched for the perfect recipients (8 households, to be exact), then I baked the cookies, made them look cute and set off on my adventure.

Now the cookie recipe I chose had to be amazing - I'm trying to persuade people to entrust the biggest asset that they own to my care. And THIS recipe is the one that I chose. Just look at them... 


Mmmm... those gooey, melty marshmallows. That crispy, chocolatey outside paired with the warm and rich center. Yes, these may throw others into a diabetic coma, but for those of us with sugar constantly coursing through our veins, they are a fabulous little chocolate fix.

And get this - they are gluten free! Yeah! And easy! This recipe is a winner all across the board! Go ahead, give them a try. You KNOW you want to. :)

Ooey, Gooey Rocky Road Cookies (isn't that the most perfect name for them?)

Ingredients:
3 cups powdered sugar
2/3 cup unsweetened cocoa powder
1/4 tsp salt
3 large egg whites
1 TBSP vanilla extract
2 cups semi-sweet chocolate chips
2.5 oz toasted sliced almonds
mini marshmallows

1. Preheat oven to 350. Line baking sheet with parchment paper (or use silpat). In a large bowl, sift together the powdered sugar and cocoa powder. Whisk in the salt. Add egg whites and vanilla and whisk until combined. Stir in the chocolate chips and the almonds. 


**How easy is that? No waiting for butter to soften... no need to cream the butter and sugar... no need to get your mixer dirty... lol being impatient about my sweets, this is a perfect recipe for when I'm craving chocolate RIGHT NOW. :)

2. Use a tablespoon to portion cookie dough onto baking sheets. Top with desired number of marshmallows - I used 3-4, next time I'll probably do 5. :) Also, waiting until this point to add the marshmallows keeps them from becoming a transparent, goopy mess. I've used mini marshmallows in another cookie recipe (that I'll have to share later!) and when mixed into the cookie dough, they always just completely melted onto the tray. While they were still totally delicious, they were terribly messy and a pain to clean off of the cookie sheets - this is a MUCH better method!


3. Bake for 10-12 minutes or until the marshmallows are a beautiful golden-brown. Let them set on the cookie sheet for a few minutes before moving to a wire rack to cool. Enjoy them with a cold glass of milk. It'll be heaven!

And THAT is my kind of marketing. :) Surely someone will take me up on such a sweet deal, right?!


Monday, September 24, 2012

The 3 P's of OAMC

So, I started writing a post about the ENTIRE OAMC experience... but decided it was way, way, WAY too long! I mentioned it to Chris, my DH, and he suggested that I break it up into 3 segments. So obvious, right? But he even named them for me! Planning, Prep Work and Process. And the 3 P's of OAMC are born! Thanks, Chris!

Logically, this post is going to be about the first P - Planning. This mostly consists of finding recipes and making a shopping list, with just a couple of other minor details.


Ok, so OAMC is a wonderful concept!

But then you start thinking about all of the little things that have to magically come together to make it a successful experience and it starts to look a little less appealing and a lot more overwhelming....

At least, that's how it was for me. I LOVED the idea, but didn't have the courage to jump right in. I was concerned about the grocery bill. YIKES! I was sure it would be astronomical. I couldn't figure out how I could make it work with a toddler running around and a husband at work. I was hesitant to actually FREEZE my food. Would it really taste as good when I cooked it? And what about recipes? What could I freeze and how should I reheat/cook it?

A lot of these concerns were things that I wouldn't be able to address until I actually got into it, so I researched what a could and decided I'd just go for it!

My favorite part, by FAR, is searching for recipes. :) I will browse recipes forever! I've never sat down and read a cookbook from cover-to-cover, but I've gotten close... A lot of recipes never make the cut. I feel like I'm somewhat adventurous in the kitchen but only to a degree. I know what my family likes and tend to stick with recipes that I know will get eaten. Who wants to waste time and money on a meal that nobody will eat?

That was one of the obstacles I had to tackle with OAMC. There are several great blogs out there about the process but some of them use recipes that my family would never eat... No offense, Mama and Baby love (and all of the other super nutritional bloggers, for that matter), but a lot of your recipes just would not work in my house. I'll do one of those wonderful steamed veggies you can make in the microwave in 5 minutes as an easy side dish, and sometimes I can get them to eat spinach or broccoli hidden in an entree... but that's about it.

I'm always impressed by women who can get their children to eat all 5 veggies everyday... Mine take vitamins. That counts for something, right?

Anyway, for my first go at OAMC I chose a variety of recipes - some for the crockpot, some casseroles, some that you just assembled that day, etc... (I think I'd do ALL crockpot recipes, just for the ease of it, but I only have one crockpot and I do NOT want to have to wash it every single day!). I found some recipes on OAMC websites, but most were my own variation of recipes I knew we liked already, and honestly, I think that's why it worked out so well.

By switching to OAMC I didn't change the way my family eats, just the way that I prepare it and that's EXACTLY what I needed.

Here's a list of the recipes we made at the most recent cook:

Spinach Pesto Manicotti
Cilantro-Lime Chicken
Red Beans & Rice
Lazy Chicken
Fauxtisserie Chicken
Sour Cream and Bacon Chicken
3 Packet Pot Roast
Crockpot Ravioli Casserole
Creamy Turkey Dinner
Teriyaki Chicken
Slow Cooker Fajitas
Cheesy Chicken and Rotini
Pesto Chicken Penne
Lasagna
Honey Sesame Pork Chops
Creamy Chicken and Broccoli

16 total meals. We cooked on August 28, just almost weeks ago, and my family still has 3 meals left in the freezer. So although 16 doesn't sound like that many meals, they always last longer than you anticipate. Eating leftovers or having a pizza night each week really seems to help stretch them out over a looong period of time.

The first time I cooked I made 23 recipes. They lasted us WELL over 2 months. That's just another thing to factor in as you decide to take the plunge. How many meals will you reasonably make each week? How often do you cook now? Do you eat leftovers pretty regularly? Do you have a date night? Oh, and while we had plenty to eat, there really wasn't any room leftover in our small freezer.


Ok, so you've chosen your recipes and now you're ready to start making your shopping list. Something I like to consider in choosing recipes is whether or not certain ingredients overlap - can I save money buying a larger size of a particular ingredient and split it between recipes? Take note of that as you make your list.

Go through each recipe and mark the amounts that you need - the number of cups of shredded cheese, or the number of ounces of a canned good, etc... That will keep you from overbuying at the grocery store and help you to remember if certain ingredients need to be used for multiple recipes.

It also helps if you organize your list in a way that is familiar to you. Personally, I organize it by product location in the store. I start in the back and make my way forward. This way you don't spend all day weaving back and forth through aisles looking for items that you forgot. To each his own, do what works for you! 

As far as saving money... I mentioned before that couponing is not my thing, and I don't pay much attention to sales fliers. On our most recent group cooking day, we attempted to really use weekly specials and various grocery stores to our advantage, but it turned out that the online ad and the store ad were different and we ended up wasting a lot of time driving between 5 separate stores and a lot of money because we got frustrated and just bought the items we were missing at unusually high prices because we did not have the time or patience to go back to the first store.

I realize that my experience is not typical, and I should take it in stride as a learning experience and only look at the in-store ad from now on.... but I'm pretty disillusioned and probably won't exert the effort on that the next time around. However, if you are a bargain shopper and pay attention to that sort of thing, I'm sure you will save TONS of money using those skills for OAMC. Maybe you should start cooking with me and let me benefit from that specialized skill set... ;)

One last thing that you will absolutely need to include on your shopping list is the freezer bags or foil baking pans that you will be needing. And when I say "freezer" bag, I mean it. You want to be able to count on the food lasting all month, and if it's NOT in a freezer bag... well, there's no guarantee. 

Ok, so those are the things to consider as you plan your OAMC cooking day - 


  • Decide how  many recipes you and your family will reasonably use in a month.
  • Choose recipes that your family likes or would be likely to eat.
  • Choose a variety of recipes with different cooking methods.
  • Try to find recipes with similar ingredients - this isn't entirely necessary, but would make shopping somewhat easier and less expensive.
  • Create your shopping list in an organized way that makes sense to you and will keep you from running all over the store.
  • And remember to include your freezing supplies - foil pans, freezer bags, sticky labels (if you'd like), duct tape (to keep ingredients that are added later with the rest of the ingredients, see picture) - when making your shopping list.
This is an example of how to use duct tape with OAMC.

Creamy Chicken and Broccoli is cooked in the crockpot and has a few ingredients that are added in the last half hour of cooking. In order to keep the broccoli and cheese with the recipe, I like to duct tape them together. Really fancy... :)

It does take up a lot of space, but it ensures that you will definitely have your ingredients on hand and where you can find them when it's time to cook.


And THAT is your first P of OAMC.

Pretty straightforward, right?

Friday, September 21, 2012

Old Bananas...

I really like bananas. But apparently I'm the only one in my family. (Chris will eat them but only if they're still really green and bitter. Weird, I know) So I'll buy a few with really great intentions of eating them in an attempt to be healthy.... but I'll eat one, maybe two and then forget about the rest. And then I end up with this:
How frustrating is that? :(
(the one in the back had been in my freezer for about a week...) 

Now I am not one to just throw things away, so I had to come up with another solution. As I was perusing through some lovely bread recipes I came across this recipe and decided it was the perfect opportunity to put these little guys to good use.


Double Chocolate Banana Bread
Ingredients:
1 cup sugar
2 eggs
1/3 cup vegetable oil
1 1/4 cups mashed bananas (about 3) * I didn't even bother mashing them before I threw them in, I let the mixer do all the work... and saved myself from washing another bowl. :)
1 tsp vanilla extract
1 1/2 cups flour
1/2 cup cocoa
1 tsp baking soda
1/2 tsp salt
1 cup chocolate chips (I used semisweet, but I'm thinking next time I'll try white chocolate chips... )

1. Preheat the oven to 350* and coat an 8x4in pan with cooking spray
2. Combine sugar, eggs and oil in a medium bowl. Mix until combined. Add bananas and vanilla and mix well. Add flour, cocoa, baking soda and salt. Mix in at a low speed (you don't want a big mess!). Stir in chocolate chips.
3. Bake for 60-70 minutes or until toothpick inserted in center comes out clean. Let cool in pan for 10 minutes, remove from pan and cool completely on wire rack. Enjoy!


Simple enough, right? And honestly, I'm not the best breadmaker around, but this turned out QUITE nicely! The neighbors enjoyed it and so did I. I had a hard time getting my boys to dig in, though... I guess it's a guy thing. I'm pretty sure you could bake just about anything and as long as there was chocolate involved I would jump in line to give it a try!


The perfect little snack. It's even healthy... kind of. ;)
Just look at those gooey/melty/wonderful chocolate chips! Oh yeah...


Wednesday, September 19, 2012

Lazy Chicken

So I'm kind of curious as to how you will react to this recipe... It could go two very different ways. Either you'll be disappointed because it's so ridiculously simple OR you'll feel like you've hit the jackpot. Either way, I'm just glad you're reading. :)

Lazy Chicken is a recipe I picked up here, at my favorite crockpot recipe destination! This recipe is so amazingly easy and the possibilities really are endless! All you do is throw some chicken in the crockpot (I usually use 2 or 3 big chicken breasts), add a jar/bottle of your favorite sauce and cook on low all day. Then you use two forks to shred it and serve it however your heart desires. In the original recipe she uses chicken and red pasta sauce... as delicious as that probably is, I have never actually done it that way. Our favorite is bbq sauce, but we'll mix it up from time to time using various other bottles of Lawry's sauces or marinades. We probably should give that pasta sauce a try though...

Maybe that doesn't sound that exciting to you, but wait, there's more! :) You could follow those directions and cook it in the crockpot all day... OR you could thaw it and cook it on the grill... OR you could thaw it and bake it. How's THAT for versatile? Not only can you use whatever sauce tickles your fancy, you can cook it pretty much however you want as well! Oh, and then you can serve it in a variety of ways too - over pasta or rice, on a sandwich, by itself, etc....

Like I said before, our favorite is bbq sauce. I'll take it out and let it thaw in the fridge during the day, then Chris will grill it and we'll add some lettuce and tomato and eat it as bbq chicken sandwiches on those delicious 40-minute rolls. Oh yeah! I seriously need to make a couple of these each month...


Lazy Chicken


Ingredients:
2-3 large chicken breasts
1 bottle/jar of your favorite sauce/marinade

To make immediately: place chicken in crockpot, add sauce. Cook on low 6-8 hours. Shred with two forks, serve as desired.

To Freeze: place chicken in gallon-size freezer safe bag, add sauce. Freeze. :)
When ready to prepare, either follow directions above.
OR thaw and grill.
OR thaw and place in 8x8 baking dish. Bake at 350 for 30-ish minutes. I'm not so good with times, just check to make sure it's not pink in the center.

and Voila! Tell me that's not the easiest recipe ever...

Tuesday, September 18, 2012

Cilantro-Lime Chicken

Mexican food is basically a staple in our household. During our first couple of years of marriage, before I really had this cooking thing figured out, we ate fajitas and quesadillas several times a week. I actually kind of miss it - we would make some pretty amazing fajita quesadillas! Maybe we should make some soon...

Anyway, I've found a couple of recipes to incorporate our love of mexican food into our OAMC rotation. They're both equally delicious and they're both made in the crockpot, so the effort is minimal. YAY!

I'll go ahead and share one now, but save the other for later to keep you coming back for more. :) Prepare yourself for some DELICIOUS tacos! 


Yes, there is an excessive amount of salsa on this taco... but that's how I like it! 

Cilantro-Lime Chicken
2 cups prepared Salsa (the beauty of this is that you can choose whatever level of spice you like!)
1 (1.25 oz) package taco seasoning
1 lime
3 TBSP chopped fresh cilantro
3 lbs boneless, skinless chicken breasts

To Prepare for today:
1. Place chicken breasts in the crockpot, combine salsa, taco seasoning and cilantro in a small bowl and pour over chicken. Squeeze lime juice over the mixture. (I usually squeeze out all of the lime juice, then throw the lime halves into the crockpot too, just to add a little extra lime-y flavor.)
2. Cook on high for 4 hours or on low for 6-8 hours. Shred with two forks and serve with tortillas, cheese, sour cream, etc...

To Freeze:
1. Place all ingredients in freezer safe bag. Squeeze lime juice on top, then throw in those empty halves.
2. Cook and serve just as you would in the directions above!

This really is wonderfully juicy and delicious! And so easy too, right? Not very many ingredients, but they all come together beautifully! I always serve it as tacos, but you could definitely serve it over rice too - they're seriously that juicy! Or make some rice and beans and use it for burritos! There are lots of options and I highly doubt that you'll be disappointed with any of them.

The other beautiful part of this recipe is the speed with which it comes together on the day that we do our big cook. All you do is dump the ingredients in the bag and put it in the freezer! So quick and easy! I've been using this in our rotation since my very first try at OAMC and I imagine that won't be changing any time in the foreseeable future!

Monday, September 17, 2012

Easy, yummy bread.

I am a bread enthusiast. I love it. A lot. With OAMC, it's often the only element of our meal that I actually make each day and I have a few different recipes that we rotate through with some regularity. There's one in particular that we come back to a bit more often, but all in all, these are some awesome recipes. Try one or all of them and let me know what you think!

40-minute rolls

40-Minute Hamburger Buns Recipe

Now these are probably our favorite. As a matter of fact, I woke up to my husband and 2-year-old making them to eat for breakfast this morning. :) Aren't they cute? 


I literally make these at least twice a week and we have no trouble getting through a batch before they start getting stale and rock-like. These are easy and quick and even better than that, they're delicious! I dare you to find an easier/faster/yummier roll recipe... :) 

Ingredients:
2 TBSP Active Dry Yeast
1 cup plus 2 TBSP warm water
1/3 cup vegetable oil
1/4 cup sugar (Chris likes it when I add a little bit more...)
1 egg
1 tsp salt
3 - 3 1/2 cups flour

1. Dissolve yeast in warm water. Add oil and sugar. Let sit 5 minutes. Add the egg, salt and enough flour to make a soft dough.

2. Turn onto floured surface. Knead until smooth and elastic (3-5 minutes). Divide into rolls - the original recipe says to make 12, but we usually make between 16 and 20. Place on greased baking sheet, cover and let stand 10 minutes.

3. Meanwhile, preheat oven to 425*. Bake for 8-10 minutes or until lightly golden-brown. 


No-Knead bread

No Knead Bread Recipe

Oh man, is this stuff good! It's pretty simple, it only requires 4 ingredients - and one of those is water so I don't even know if that counts... and as the name suggests, you don't have to knead it. Woohoo! 

The only problem is that you really have to plan ahead. From start to finish the process takes from about 15 to 23 hours. Yeah, basically forever when you're waiting for some delicious, warm and fluffy bread... I accidentally stumbled upon this recipe when I was looking for a quick recipe to make with dinner one night. I got started before reading the FULL recipe and ended up being really disappointed to find out that I wouldn't be able to enjoy it until the next day. :( Where was that 40-minute roll recipe when I needed it?!

Obviously it was totally and completely worth the wait and that is why I'm passing it along now. Get this started for tomorrow night's dinner right after you make the 40-minute rolls to eat with dinner tonight. :) I promise you'll be glad you did!

Ingredients:

3 cups bread flour
1/4 teaspoon instant yeast
1 teaspoon fine table salt (or 3/4 tablespoon of kosher salt)
1 1/2 cups warm water
Covered pot (five-quart or larger cast iron, Pyrex, ceramic, enamel...something that can go into a 450F oven.)
 1. Mix dough: The night before, combine all ingredients in a big bowl with a wooden spoon until the dough just comes together. It will be a shaggy, doughy mess. Cover with plastic wrap and let sit 12-20 hours on countertop.
2. Shape & preheat: The dough will now be wet, sticky and bubbly. With a wet spatula, dump the dough on a floured surface. Fold ends of dough over a few times with the spatula and nudge it into a ball shape. You can use your hands if you like, just keep your hands wet so that the dough does not stick. Generously dust a cotton towel (not terrycloth) with flour. Set dough seam side down on top of towel. Fold towel over the dough. Let it nap for 2 hours. When you've got about a half hour left, slip your covered pot into the oven and preheat to 450F.
3. Bake: Your dough should have doubled in size. Remove pot from oven. Holding towel, turn over and dump wobbly dough into pot, using your hands to get the dough off the towel. Doesn't matter which way it lands. Shake to even dough out. Cover. Bake 30 minutes. Uncover, bake another 15-20 minutes or until the crust is beautifully golden and middle of loaf is 210F. Remove and let cool on wired rack. If not eating right away, you can re-crisp crust in 350F oven for 10 minutes.


Bread Machine Rolls


Now these ones were our go-to bread recipe for a LOOONG time. Like for years, I think... They're light and fluffy and you can eat like 6 without even realizing it! We still love them, just not quite as much as the 40-minute rolls. 
I think the prep time plays a big role in that...

These are pretty simple because you just throw the ingredients in your bread maker and let it do all the work. Then you shape them, let them rise, and throw them in the oven. Really not bad, but it still takes like 2 1/2 hours versus the 40 minutes that the other ones take.

My personal favorite perk about these ones would be their freezer capabilities. I was in charge of bringing the rolls for Thanksgiving last year and there were a LOT of people coming. I knew I wanted to use this recipe, but the bread machine can only make so many rolls at a single time. SO... the week of Thanksgiving I made a batch a day. I'd put them in the bread machine and let it do it's thing, then shaped the dough into rolls. Rather than letting them rise, I placed the little dough balls on a baking sheet and set that in the freezer. Once they were completely frozen, I popped them in a freezer bag. On Thanksgiving day I pulled out my now very full bag of dough balls and placed each ball on cookie sheets to rise (just like the recipe says). It worked like a charm! 

So, for those of you interested in bread recipes to use with your OAMC lists, this would be an excellent candidate! Enjoy!

Ingredients:
3 cups bread flour
3 tablespoons white sugar
1 teaspoon salt
1 cup warm milk
2 tablespoons butter, softened
1 (.25 ounce or 2 1/4 tsp) package active dry yeast
1 egg white
2 tablespoons water
1. Place the bread flour, sugar, salt, milk powder, water, butter, and yeast in the pan of the bread machine in the order recommended by the manufacturer. Set on Dough cycle; press Start.

2. Remove risen dough from the machine, deflate, and turn out onto a lightly floured surface. Divide the dough into twelve equal pieces, and form into rounds. Place the rounds on lightly greased baking sheets.** Cover the rolls with a damp cloth, and let rise until doubled in volume, about 40 minutes. Meanwhile, preheat oven to 350 degrees F (175 degrees C).

3. In a small bowl, mix together the egg white and 2 tablespoons water; brush lightly onto the rolls. Bake in the preheated oven for 15 minutes, or until the rolls 

** This would be the point where you'd freeze them! Then follow the rest of the directions when you decide to bake them!


Italian Bread


This recipe is also for use with your bread machine. It too takes about 2 1/2 hours from start to finish. We like this one a lot, but don't make it very often. It's great when served with Italian dishes. I made it last night to go along with our OAMC lasagna and it was perfect! Nice and dense with a crispy crust, it was a great vehicle to carry that tangy tomato sauce from my plate to my mouth. :) I think I may go eat leftovers right this second...

Ingredients:

4 cups all-purpose flour
1 tablespoon light brown sugar
1 1/3 cups warm watter
1 ½ teaspoons salt
1 ½ teaspoons olive oil
1 (.25 oz) package active dry yeast
1 egg
1 tablespoon water
2 tablespoons cornmeal

1. Place flour, brown sugar, warm water, salt, olive oil and yeast in the pan of the bread machine in the order recommended by the manufacturer. Select dough cycle; press start.

2. Deflate the dough and turn it out onto a lightly floured surface. Form dough into two loaves. Place the loaves seam side down on a cutting board generously sprinkled with cornmeal. Cover the loaves with a damp cloth and let rise, until doubled in volume, about 40 minutes. Meanwhile, preheat oven to 375*F.

3. In a small bowl, beat together egg and 1 tablespoon water. Brush the risen loaves with egg mixture. Make a single long, quick cut down the center of the loaves with a sharp knife. Gently shake the cutting board to make sure that the loaves are not sticking. If they stick, use a spatula or pastry knife to loosen. Slide the loaves onto a baking sheet with one quick but careful motion.

4. Bake in preheated oven for 30-35 minutes, or until loaves sounds hollow when tapped on the bottom.


Well there you have it! Surely you'll be able to put one of these beauties to work this week! :) Let me know what you think!

Friday, September 14, 2012

Honey Garlic Chicken


I'm sure we all have our go-to resource for recipes, right? I know I do... When I'm looking for a crockpot recipe (which happens QUITE often), the first place I peruse is this little blog.

I've used TONS of her recipes! I love the way she writes, I love her honesty (she'll tell you if it just did NOT work out), and I simply love her recipes (because I, too, love my crockpot... even if it does run too hot). Another plus is that all of her recipes are gluten free! Not that I need that... but you know, if I had to cook something for someone with a gluten allergy I totally could!

A few of the recipes from her site have made their way into my OAMC rotation,  including 3 packet pot roastSalsa, chicken and black bean soup, Pepperoncini beef sandwiches, and plenty of others... my personal favorite being the Honey Garlic Chicken.


This was the first recipe (and still the only recipe, I believe) with which I use chicken thighs, and Oh.My.Goodness are they good! I don't have an aversion to dark meat, I've just always used chicken breasts. They're cheap, they're easy to use and they come in big quantities. All of which are big pluses in my book. So obviously, I was a little bit hesitant to follow the directions... but, being the obedient girl that I am and trusting Stephanie's judgment, I gave it a shot. And I'm totally glad that I did!

This chicken always turns out so moist and flavorful, and the sauce is AWESOME! I always spoon a bunch over my chicken and rice.... yeah, these leftovers don't last long. :)

This is the recipe almost exactly as it's found on her blog - one of the few recipes I haven't tweaked, it's just that good!


Honey Garlic Chicken Ingredients:
2 lbs boneless/skinless chicken thighs
1 1/2 tsp minced garlic
1 tsp dried basil
1/2 cup soy sauce
1/2 cup ketchup
1/3 cup honey

To make immediately, place the chicken in the crockpot. Combine the other ingredients in a bowl. Mix well, then pour over the chicken. Cook on low for 5-7 hours. Serve over rice.

To Freeze: Throw all ingredients into a gallon-sized freezer bag and pop that bag right into the freezer. When you decide to cook it, just put the contents into the crockpot and cook as directed above. :) It's that simple!

Wednesday, September 12, 2012

Surprise!

Have you ever gone out on a limb and tried a brand new recipe just out of curiosity? I most definitely have. And while a lot of the times my high hopes end up being deflated by my crock pot's tendency to cook things WAY too fast, or my lack of culinary expertise, there is occasionally a recipe that makes being adventurous TOTALLY worth it!

I had an experience like this not too long ago... I found a recipe for red beans and rice and decided to check it out. I was REALLY hesitant - as I said before, my hubby's a little on the picky side, so I didn't think it would be something he'd be into... but I was willing to take that chance (it sounded WAY good to me! haha).

Now this is not a recipe that I'd ever even considered before because we're not really into soups and stews in our house (there are a few exceptions, of course). But this particular recipe is for the crockpot and I'm ALWAYS on the lookout for new/delicious/easy crockpot recipes, so I figured - why not?

The list of ingredients is pretty basic, and really inexpensive too (that's always a plus, right?). So even if my husband hated it, we could go pick up some Wendy's afterwards and still not have spent much on dinner. :)

Well, as the heading obviously suggests, we absolutely LOVED it! Like really loved it... like my DH has bragged about it to friends and family, and asked to have it every WEEK kind of loved it! YES! It's moments like those that make me feel like a hero of my little home - like I've accomplished an amazing feat, or created a priceless work of art. Oh, the simple joys of being a stay-at-home-mom... :) and then I do the dishes... haha

Anyway, here is the recipe. Go ahead and try it - take a risk and enjoy the wonderful rewards!

[Final+red+beans.JPG]

The ONLY adjustment I made, per my DH's request, was to leave out the cinnamon. The first few times I made it I left he cinnamon in. The change in flavor is very slight, so it may not make a difference for you either way, but that's the way we usually do it now.

Also, this is a staple on our OAMC list and it's super easy to convert to a freezer meal. You just throw everything except the water into a gallon-sized freezer bag. The day that you decide to cook it, pour the ingredients into the crockpot, measure 6 cups of water into the bag and then pour that in over the other ingredients (I do this because seasonings ALWAYS end up getting stuck to the insides of the bag and this way they all make it into the pot. AND who wants to make 6 trips back and forth between the sink and the crockpot? Not this girl...) Then simply cook as directed, serve over rice and enjoy! I hope this recipe is as successful in your home as it was in mine!


Monday, September 10, 2012

Football Food

Football Food!


Being new to this, I'm still trying to figure out what qualifies a food as being "blog-worthy"... and I'm coming to realize that that might mean something different for everybody. With that in mind, I decided to blog about any recipe new/old, good/amazing (because who wants the bad ones??) and just see what happens. :) So here goes:

Football season is a magical time in our house. My husband is the BIGGEST college football fan that I know. He's not the crazy/in your face/paint my entire body kind of fan, but he's the kind of fan who can tell you about every single team, their players, their strengths and weaknesses, their scores from every game of the season, etc... Because of this, we spend our Saturdays during the fall watching college football (he's lucky I became a football fan during college, otherwise he might not get this luxury).

Well this past Saturday we got an invitation from a couple from church that we don't know particularly well, to come over to watch THE game. My husband was very hesitant to leave his throne - his multi-view tv screen and freedom to flip back and forth between as many games as his heart desires, to watch a single game with a guy that he didn't know much about. So I did what any normal, logical, food-loving wife would do: I bribed him with food! Everyone else does that too, right?

I was asked to bring a side dish and dessert... and I had a REALLY hard time coming up with a side dish. I knew we were having pulled pork so I wanted to bring something simple but delicious. I searched and searched for ideas and finally narrowed it down to potato wedges or homemade mac 'n' cheese. I had potatoes in the pantry, so of course the potato wedges ended up being the winner.

I found the recipe here and figured it would be worth a shot. Now these aren't just any potato wedges - these are soaked in cream then smothered in cheese. Who doesn't love cheese? And they are pretty amazing (if I may say so myself!). But here's the recipe, so you decide!

Ingredients:
8-10 potatoes cut lengthwise into 1-inch wedges (the original recipe says to peel the potatoes, but I've never seen potato wedges like that and we kind of like the skin over here, but the choice is yours!)
3/4 cup half and half
1 1/4 cup milk  (the original call for 2 cups half and half, but honestly, that sounds WAY fattening to me and we just didn't have that much in our fridge, so I substituted a bit of skim milk for what I lacked in half and half)
2 teaspoons salt
2 cups shredded cheese (I used an Italian blend)
1/2 cup shredded parmesan (I just used the powdery stuff you put on Spaghetti...)
2 Tablespoons chopped parsley
1/2 cup crumbled bacon (I omitted these last two, not because they didn't sound great, but because I didn't have them on hand and was not interested in making a trip to the store...)
* I also added a generous sprinkle of Cajun seasoning over the top just to give it an extra little kick, but like most other ingredients, that's totally up to you!

Sooo... you'll start with a whole pile of potatoes, scrub them well then slice them up.

Photo
Then you'll throw them in a pan. The recipe said to use a 9x13 pan, but mine didn't really fit in there, so I used a jelly roll pan instead (11x15, I think?). Then you pour the milky mixture over it and sprinkle it with the salt.**


Now you put it in the oven at 350* and bake for 45 minutes. Take it out, add the cheeses and bake for another 15-20 minutes, until your preferred doneness - whether you like them crispy or soft... Serve warm. These would be pretty amazing with Ranch dressing. And I am a little disappointed that I didn't add the bacon or parsley just because I'm sure it would look so much prettier, but here they are - and they are delicious!


**Now I must say, I was VERY hesitant about the milk/cream mixture. It sounded weird and kind of gross to me, but I went along with it anyway... It smelled interesting as it baked and when I took it out after 45 minutes it even had kind of a crusty milk skin on it. (Yeah, sounds terrible, right?) But I was already in way too far to back out at that point, so I covered it with the cheeses (I sprinkled on the parmesan first, then covered that with the shredded Italian cheese blend), and put it back in for another 20 minutes, trying to ignore the crusty-ness of the milk mixture.

And you know what? It totally paid off!! I've made potato wedges once before and while they were pretty tasty, they were also pretty dry. These ones were creamy and flavorful - kind of like mashed potatoes but with a little crispy-ness from the baked cheese. Mmmmmhmmmmm. :)

Oh, and if you're interested in what I made for dessert (and you should be, it was AWESOME!), you can find it here!


Needless to say, as bored as he may have been with the other guy, he was perfectly happy with the spoils of our visit... happy enough that he might even be willing to do it again. :)

Wednesday, September 5, 2012

I love food.

I do. I really, really do. I love to eat it. I love the social nature of it - I mean, seriously, when you're coming up with things to do with a group of friends, eating is ALWAYS at the top of the list. Right:? Or is it just me? I even love to cook. Sometimes. As a mother of two very young children, there's not always a whole lot of time to slave over a delicious home-cooked meal. That is why I came to embrace once-a-month-cooking.

I was really nervous to give it a shot at first. The concept REALLY intrigued me but it seemed like so much work and it seemed like the grocery bill would be HUGE! But as the arrival of my second little one got closer and we decided we should try to move right before her grand entrance, I sucked it up and took the plunge.

That first time around I very ambitiously decided to make 23 meals! (WHAT?) Yes, that's right. I have since scaled back a bit, realizing that 23 meals lasts WAY longer than a month. But I was pregnant and moving and wanted to be overly prepared, just in case. While it was a ton of food and required lots of strategic planning and skillful arrangement within the freezer, it worked out beautifully! So beautifully, in fact, that I have been completely converted to the ways of OAMC.

While I can't confidently say that it is saving me tons and tons of money (we still make weekly trips to the grocery store for milk, bread, etc... and if the husband goes, there's no telling how much money he'll spend or what interesting treats he'll come home with - am I the only girl with this problem?!), I can assure you that dishes sometimit is saving us money because we aren't going out to eat... as often... (a girl still needs a break from doing the dishes!), and it is saving me time - which is SUPER valuable with little ones hanging around.

And THAT is precisely why I want to share this concept with other moms like me. I know it's nothing new - there are TONS of blogs around that give great insight into the world of OAMC, and while I've gotten a lot of great information from them, I have learned some things on my own that I think are worth sharing.

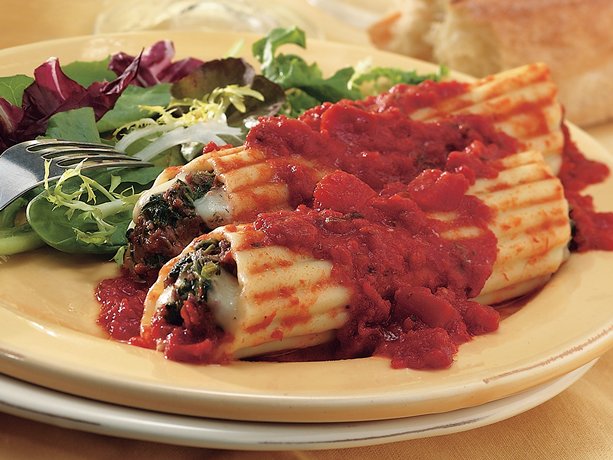
With a picky 2-year-old and almost-as-picky husband I've had to come up with my own recipes to attempt as freezer meals. It has been a lot of trial and error as I continue to perfect our ideal monthly menu, so what I will gladly pass along to you is what I have found to work best. With this first post, I wanted to include my family's all-time FAVORITE recipe for OAMC, Spinach Pesto Manicotti. (We've got several favorites and I'll pass them all along too, but I think my husband would dub this one his ULTIMATE favorite recipe.) I found it shortly after we got married and have making it at least once a month ever since. The original recipe is found here and I've really only made some minor changes...

Spinach Pesto Manicotti


Prep Time: 35 mins               Bake Time: 45 mins          Servings: 6


Ingredients:
8 oz. uncooked manicotti
1 lb extra lean ground beef (I like to use turkey!)
9 oz frozen chopped spinach, thawed and drained
4 oz (1 cup) shredded mozzarella
1/2 cup purchased pesto (I use Classico)
1 egg
1 jar tomato pasta sauce

Directions:
Spray foil pan with cooking spray. Cook manicotti according to instructions on package until desired doneness. Drain. Rinse with cold water and drain well.

In a large bowl, combine ground beef (or turkey), spinach, mozzarella, pesto, and egg. Fill each manicotti with meat/cheese mixture. (I usually open each manicotti shell along one side, add the filling, then fold the top back over... nobody ever notices and it's WAY easier than trying to get all that filling into that little tube!) Place each filled manicotti in pan. Pour tomato sauce over the filled pasta. Cover with two layers of foil and place in the freezer.

Heating directions:
Thaw manicotti in fridge that day. Preheat oven to 400*. Bake covered for 40-45 minutes or until filling is no longer pink in the center. (The cooking time can really vary, so please check the center before digging in... it may require some self-control, but I don't want anybody getting sick!)